Next: 1.5.7 Limitations and bugs Up: The EMC˛ preprocessor Prev: The EDIT_MESH application Index Contents
![]()
![]()
![]()
![]()
![]()
![]()
![]()
![]()
![]()
Next: 1.5.7 Limitations and bugs
Up: The EMC˛
preprocessor
Prev: The EDIT_MESH application
Index
Contents
In this section, we show how to mesh a unit square with a hole. First of all, we run emc2, enter the number of the F3D graphic device and answer the few supplementary questions that are posed by the system (this depends on the particular F3D implementation).
1/4= on the keyboard: a circle of center (.5,.5) and
radius 1/4 is displayed. Warning: the circle as well as the straight line
is only a construction aid. It must be transformed into an arc
The construction of the geometry is done (figure 1.33).
We can switch to the PREP_MESH application.
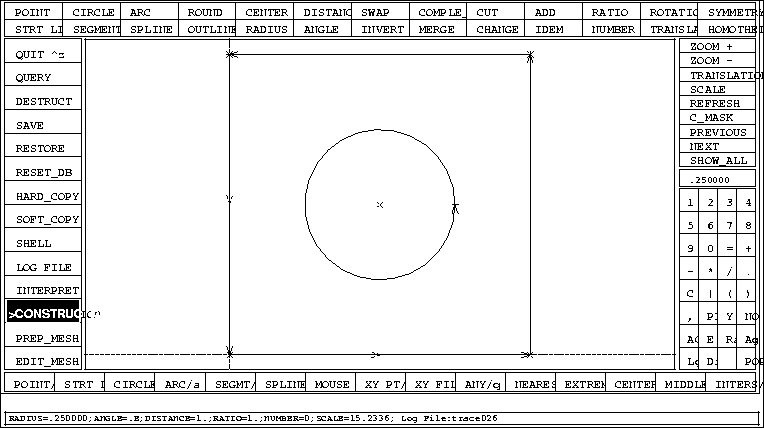
Figure 1.33: The geometry of the square domain with a hole
4= on the keyboard
12= on the keyboard
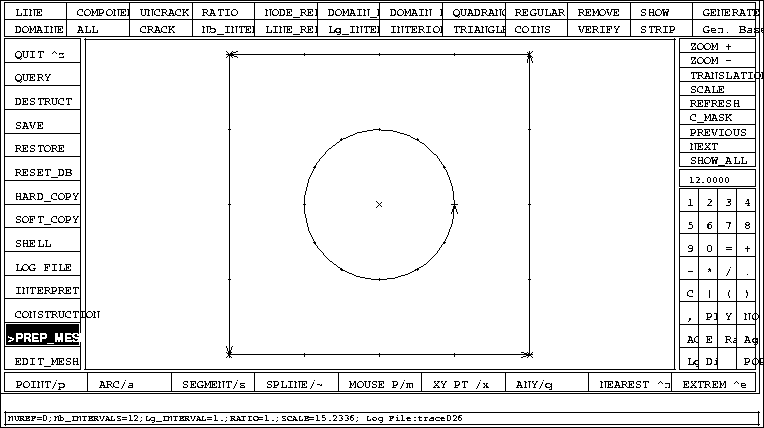
Figure 1.34: Discretization of the lines of the square domain with a hole
The file square_with_hole.emc2_bd :
'-- TYPE N BD(1) BD(2) BD(3) BD(4) BD(5) NBNODE RATIO NUREFG NUREFD NUREF1G NUREF1D NUREF2G NUREF2D FIS'
'DROITE'        1 -1.000000 0.0000000 1.000000 0.0000000 0.0000000 0.0000000 0 0.0000000 0 0 0 0 0 0 F
'DROITE'        2 -1.000000 1.000000 0.0000000 0.0000000 0.0000000 0.0000000 0 0.0000000 0 0 0 0 0 0 F
'POINT'       3 0.0000000 0.0000000 0.0000000 0.0000000 0.0000000 0.0000000 0 1.000000 0 0 0 0 0 0 F
'POINT'       4 0.0000000 1.000000 0.0000000 0.0000000 0.0000000 0.0000000 0 1.000000 0 0 0 0 0 0 F
'POINT'       5 0.0000000 0.0000000 1.000000 0.0000000 0.0000000 0.0000000 0 1.000000 0 0 0 0 0 0 F
'POINT'       6 0.0000000 1.000000 1.000000 0.0000000 0.0000000 0.0000000 0 1.000000 0 0 0 0 0 0 F
'POINT'       7 0.0000000 0.5000000 0.5000000 0.0000000 0.0000000 0.0000000 0 1.000000 0 0 0 0 0 0 F
'SEGMENT'     8 -3.000000 0.0000000 0.0000000 1.000000 0.0000000 0.0000000 5 1.000000 0 0 0 0 0 0 F
'SEGMENT'     9 -3.000000 1.000000 0.0000000 1.000000 1.000000 0.0000000 5 1.000000 0 0 0 0 0 0 F
'SEGMENT'     10 -3.000000 1.000000 1.000000 0.0000000 1.000000 0.0000000 5 1.000000 0 0 0 0 0 0 F
'SEGMENT'     11 -3.000000 0.0000000 1.000000 0.0000000 0.0000000 0.0000000 5 1.000000 0 0 0 0 0 0 F
'CERCLE'      12 0.2500000 0.5000000 0.5000000 0.0000000 0.0000000 0.0000000 2 1.000000 0 0 0 0 0 0 F
'ARC'         13 -2.000000 0.5000000 0.5000000 0.7500000 0.5000000 6.283185 13 1.000000 0 0 0 0 0 0 F
'MASQUE' 0 -0.4632312 1.465731 -5.0000010E-02 1.052500 0.0000000 0.0000000 0 0. 0 0 0  0 0 0  F
'RADIUS' 0 0.2500000 0. 0. 0. 0. 0. 0 0. 0 0 0  0 0 0  F
'ANGLE' 0 0.0000000 0. 0. 0. 0. 0. 0 0. 0 0 0  0 0 0  F
'DISTANCE' 0 1.000000 0. 0. 0. 0. 0. 0 0. 0 0 0  0 0 0  F
'RAISON' 0 1.000000 0. 0. 0. 0. 0. 0 0. 0 0 0  0 0 0  F
'NOMBRE' 0 0.0000000 0. 0. 0. 0. 0. 0 0. 0 0 0  0 0 0  F
'ECHELLE' 0 14.32432 0. 0. 0. 0. 0. 0 0. 0 0 0  0 0 0  F
'NUREF' 0 0.0000000 0. 0. 0. 0. 0. 0 0. 0 0 0  0 0 0  F
'NB_INTERVALS' 0 12.00000 0. 0. 0. 0. 0. 0 0. 0 0 0  0 0 0  F
'NUDSD' 0 1.000000 0. 0. 0. 0. 0. 0 0. 0 0 0  0 0 0  F
We have completed the preparation of the mesh (figure 1.34)

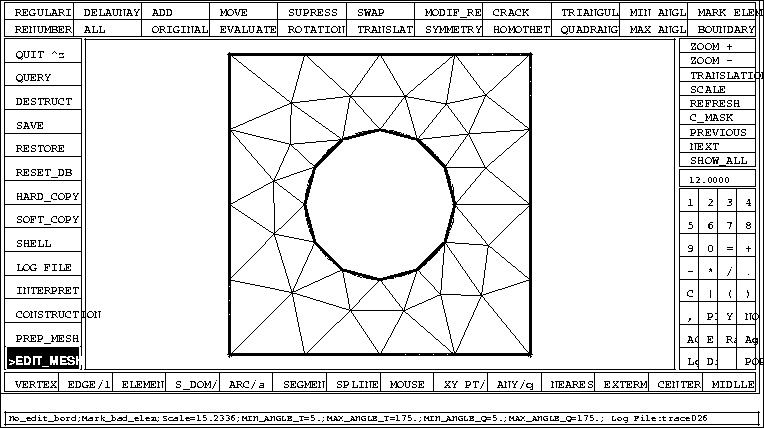
Figure 1.35: The final mesh in the square domain with a hole
The file square_with_hole.am_fmt:
 44 60  -- nbs,nbt
      1      2     29        25     24     29
     24     31     29         3     43     30
     15     16     31        22     34     23
     26     25     30        23     34     31
     32     27     43        28     27     32
     22     33     34        21     40     38
      4     32     43        34     15     31
     33     14     34        21     33     22
      5      6     39        20     42     40
     28     32     39        41     42     19
      7      8     36        18     36     37
     28     39     35        34     14     15
     12     13     38         6     35     39
     28     35     17        43     27     26
     38     13     14        23     31     24
      7     36     17        31     16     29
     11     12     40         3     30      2
     37      8     44        30     25     29
     41     10     42        30     29      2
     44     10     41        29     16      1
     35      6      7        17     35      7
     36      8     37        17     36     18
     41     37     44        18     37     19
     38     14     33        21     38     33
     39     32      4         5     39      4
     40     12     38        20     40     21
     42     10     11        37     41     19
     42     11     40        19     42     20
     43     26     30         4     43      3
     44      8      9        10     44      9
   0.000000E+00   0.000000E+00      2.500000E-01   0.000000E+00
   5.000000E-01   0.000000E+00      7.500000E-01   0.000000E+00
   1.000000E+00   0.000000E+00      1.000000E+00   2.500000E-01
   1.000000E+00   5.000000E-01      1.000000E+00   7.500000E-01
   1.000000E+00   1.000000E+00      7.500000E-01   1.000000E+00
   5.000000E-01   1.000000E+00      2.500000E-01   1.000000E+00
   0.000000E+00   1.000000E+00      0.000000E+00   7.500000E-01
   0.000000E+00   5.000000E-01      0.000000E+00   2.500000E-01
   7.500000E-01   5.000000E-01      7.165064E-01   6.250000E-01
   6.250000E-01   7.165064E-01      5.000000E-01   7.500000E-01
   3.750000E-01   7.165064E-01      2.834937E-01   6.250000E-01
   2.500000E-01   5.000001E-01      2.834936E-01   3.750001E-01
   3.749999E-01   2.834937E-01      4.999999E-01   2.500000E-01
   6.249999E-01   2.834936E-01      7.165062E-01   3.749999E-01
   2.077567E-01   2.075703E-01      4.017089E-01   1.482612E-01
   1.483122E-01   4.021604E-01      7.024530E-01   2.009149E-01
   2.021900E-01   7.009841E-01      1.471843E-01   5.790281E-01
   8.609530E-01   3.646002E-01      8.519265E-01   6.222693E-01
   7.943417E-01   7.355210E-01      2.050139E-01   8.383228E-01
   8.379703E-01   1.980158E-01      4.015485E-01   8.609668E-01
   7.210978E-01   8.353896E-01      5.831956E-01   8.603261E-01
   5.796704E-01   1.470356E-01      8.526899E-01   8.640727E-01
       0       0       0       0       0       0       0       0       0       0
       0       0       0       0       0       0       0       0       0       0
       0       0       0       0       0       0       0       0       0       0
       0       0       0       0       0       0       0       0       0       0
       0       0       0       0       0       0       0       0       0       0
       0       0       0       0       0       0       0       0       0       0
       0       0       0       0       0       0       0       0       0       0
       0       0       0       0       0       0       0       0       0       0
       0       0       0       0       0       0       0       0       0       0
       0       0       0       0       0       0       0       0       0       0
       0       0       0       0
The parametrization of the naca0012 is


To normalize the naca0012, we use the change of variables:


      PROGRAM NACA12
      DOUBLE PRECISION X,Y,C,XX,YY
      PARAMETER (C=1.008930411365D0)
      INTEGER NB,I
C --------  ENTER THE NUMBER OF INTERVALS -----------
      READ *,NB
      DO I=0,NB
C -----------------------------------------------------
C              4                                       |
C      WE USE X  INSTEAD OF X SO THAT THE PROGRESSION  |
C      OF GENERATED POINTS IS DENSER AROUND O          |
C -----------------------------------------------------
       XX= (DBLE(I)/DBLE(NB))**4
       X = C*XX
       Y = 5*.12*( 0.2969*SQRT(X) -0.126*X
     +            -0.3516*X**2    +0.2843*X**3 -0.1015*X**4)
       YY = Y / C
       PRINT*, XX,YY
      ENDDO
      END
We generate the file "naca12.21pts" by using this program with 20 intervals.
The file "naca12.21pts":
 0.0000000000000000 0.0000000000000000
 6.2500000000000000E-06 4.4290213310617220E-04
 1.0000000000000000E-04 1.7659364374154260E-03
 5.0625000000000000E-04 3.9520447457293480E-03
 1.6000000000000000E-03 6.9724900930098020E-03
 3.9062500000000000E-03 1.0785816129632120E-02
 8.1000000000000000E-03 1.5335254409279880E-02
 1.5006250000000000E-02 2.0543538719326360E-02
 2.5600000000000000E-02 2.6304013971036800E-02
 4.1006250000000000E-02 3.2467169756843240E-02
 6.2500000000000000E-02 3.8822480697810590E-02
 9.1506250000000000E-02 4.5076893778196040E-02
 0.1296000000000000 5.0833559338836810E-02
 0.1785062500000000 5.5577241169031020E-02
 0.2401000000000000 5.8675384962268570E-02
 0.3164062500000000 5.9403968668221290E-02
 0.4096000000000000 5.7000809116986590E-02
 0.5220062500000000 5.0728415111155510E-02
 0.6561000000000000 3.9881091560527040E-02
 0.8145062500000000 2.3576580331835940E-02
 1.000000000000000 2.0060198232592660E-14
Figure 1.36: The complete geometry of the naca0012 and infinity
We switch to the PREP_MESH application to define the discretization of the contours.

Figure 1.38: A view of the discretization of all contours
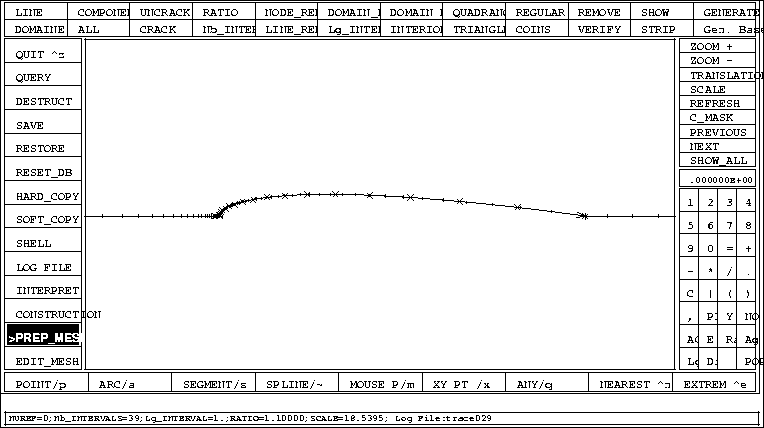
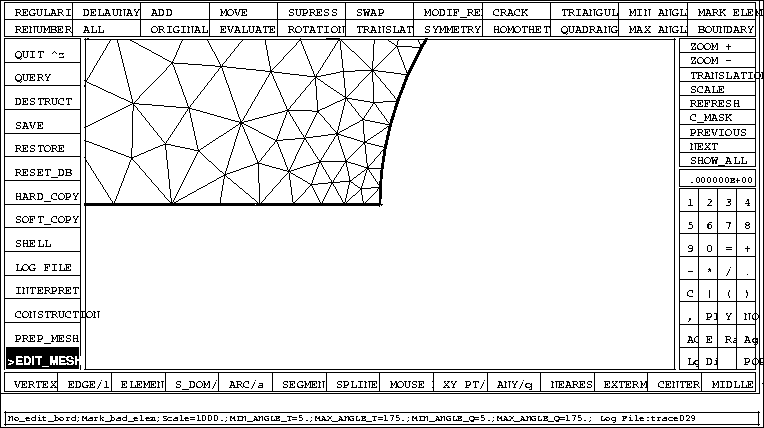
Figure 1.39: Zoom on the discretization of the contours around the naca
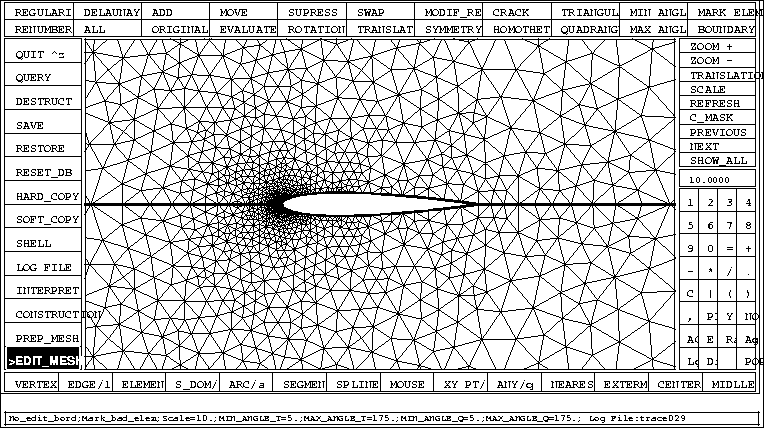
We generate the mesh by switching to the EDIT_MESH application.
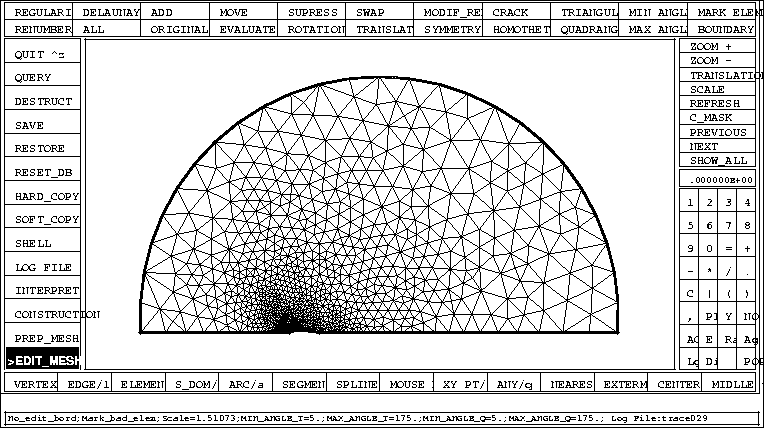
Figure 1.40: Mesh around the half naca0012
We now define references in order to take boundary conditions into
account:
1 on infinity  , 2 on the NACA, 3 on the trailing edge.
To obtain a complete mesh, we make it symmetrical. First we change point of view to see the whole naca.

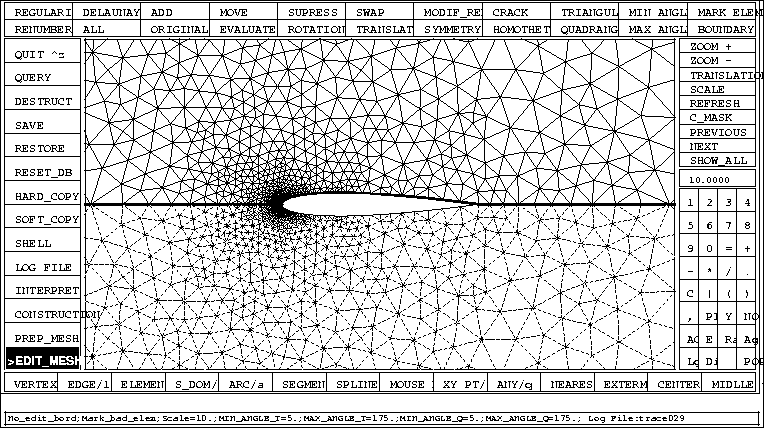
Figure 1.42: Zoom 10 on the symmetric mesh of the naca0012