Next: The PREP_MESH application Up: The EMC˛ preprocessor Prev: 1.5.2 The global menus Index Contents
![]()
![]()
![]()
![]()
![]()
![]()
![]()
![]()
![]()
Next: The PREP_MESH application
Up: The EMC˛
preprocessor
Prev: 1.5.2 The global menus
Index
Contents
This application is controlled by the application menu on top of the screen (figure 1.24) and the selection menu on bottom of the screen (figure 1.18). It is used to build and manipulate 2D objects made up of points, segments, arcs and splines. Circles and straight lines are only used as construction aids.
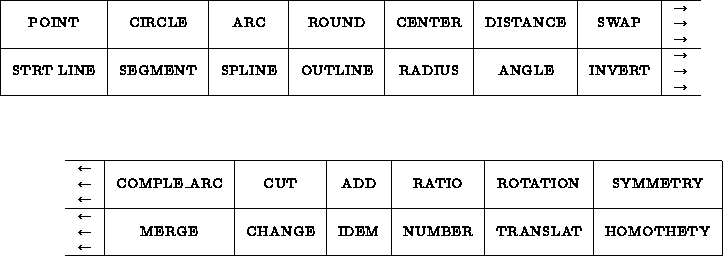
Figure 1.24: The CONSTRUCTION application menu
Let us recall that points, straight lines, circles, arcs, segments, splines, coordinates (current points, endpoints, etc.) can be selected via the selection menu. We will thus denote by <POINT> , <LINE> , <CIRCLE> , <SEGMENT> , <ARC> , <SPLINE> , <COORD> the operation of selecting one of these elements or part of it. Furthermore, a <VALUE> is created by using the calculator or its shortcuts, see sections 1.5.2,1.5.2 for more detail.
In the meta-syntax of description of the construction language, we will note
xxx a series of operations defined by
<xxx> = ... . ;
We will use the following symbols:
Example: The expression: <xxx> = ( A | ") *(B|C) E ; can be used to enter character strings beginning or not by A, composed of a series of B or C and ending with E.
Examples of valid strings:
  ABBCCCCE               E      AE      CBCBCBCBCBCBCBE
  ABBBBBBBE              BE     ABE     BCBCBCBCBCBCBCE
  BBBBBBBBBE             CE     ACE     CCCCCCCCCCCCCCE
We will call
In the meta-syntax, this reads:
   <point_coor> = <POINT>      | <COORD>;
   <constraint> = <point_coor> | <LINE> | <CIRCLE> | <ARC>
                               | <SEGMENT>;
   <element>    = <constraint> | <SPLINE>;
In the definition of constraint, the ARC is identified with its supporting
circle. Similarly, the SEGMENT is identified with its supporting straight line.
Remark:
In the database the elements are described by:
| POINT | (a,b) with: x=a; y=b |
| LINE | (a,b,c) such that ax+by+c=0 |
| CIRCLE | center(a,b) and radius r |
| SEGMENT | (P1,P2) with P1=(x1,y1) and P2=(x2,y2) |
| ARC | center at P1 passing through P2 and with angle  , , |
| with P1=(x1,y1) and P2=(x2,y2) | |
| SPLINE | (number of points, head of the list of points) |
At the level of the CONSTRUCTION application, all menus other than the CONSTRUCTION menu are filtered through the applications SELECTION, CALCULATOR, GENERAL and GRAPHIC SCREEN MANAGEMENT. Thus clicking in one of these menus has no direct effect on the application, except possibly changing the selection mode or entering a value. Only the boxes of the application menu and the selections govern the CONSTRUCTION application. For this reason, we will denote by XXXX the operation of clicking in the XXXX box of the current application menu. There will be no confusion with boxes of the same name in other menus.
Example:
The state of the system is a set of variables used by the application. The global variables of the application are:
We denote by <state modif> a modification of the state of the system, which is to say a modification of the value assigned to one of the variable.
<state modif> = *( <distance> | <radius> | <angle> | <ratio> | <number> )
 POINT
       *(  <COORD>
         | <POINT>  (  <CIRCLE> | <LINE>
                     | <ARC>    | <SEGMENT> | <SPLINE>  )
         | <LINE>     <element>
         | <CIRCLE>   <element>
         | <SPLINE>   <element>
        );
Examples of point construction
We start by clicking in the POINT box of the construction menu to switch to point construction mode. Then
 LINE  *(  <constraint> <constraint>
            | IDEM *<SEGMENT>
          );
If the constraints are (the order is irrelevant):
 CIRCLE
   *(  <radius> *( CENTER <point_coor> | <constraint> <constraint>)
     | <constraint> (  <radius>  <constraint>
                     | <constraint> ( <radius> | <constraint> ))
     | CENTER <point_coor> *(<radius> | <constraint>)
     | IDEM *<ARC>
    );
Explanation of the various cases (the order is irrelevant):
 ARC *(  CENTER <point_coor> *(   <angle> <constraint>
                           | <radius>
                           | <constraint> (<angle> | <constraint>))
        | <radius> *(  CENTER <point_coor>
                    | <constraint> <constraint> )
        | <constraint> (   <radius> <constraint>
                         | <constraint> (<radius> | <constraint>))
        | IDEM *<CIRCLE>
      );
Explanation of the various cases (the order is irrelevant). To construct an
ARC, we first create a circle satisfying the same constraints and then
we create an arc on this circle.

 on each selected circle.
SEGMENT *( <constraint> <constraint> );Explanation of the various cases (the order is irrelevant).
To construct a SEGMENT, we first create the LINE that has the same constraints. Then we construct a segment on this line connecting the two points of tangency to the two constraints if they exist. Otherwise, we use the state variable %DISTANCE.
Thus for example:
SPLINE <point> *<point>;Constructs the cubic spline passing through the points. We can create a closed spline by making the last point equal to the first point (by selecting it).
ROTATION , TRANSLAT , HOMOTHETY , SYMMETRY all define transformations that can be applied on selected elements.
 ROTATION    <state modif> ( CENTER | " ) <point_coor> <state modif> *<element>
 TRANSLAT    <point_coor> <point_coor>    *<element>
 HOMOTHETY  <state modif> CENTER (<point_coor> | " ) <state modif>   *<element>
 SYMMETRY   (<point_coor> | <LINE>| <SEGMENT>)   *<element>
 1, the elements are moved, otherwise
%NUMBER-1 copies of each element are created. Therefore, after
transformation there are %NUMBER elements on the screen.
1, the elements are moved, otherwise
%NUMBER-1 copies of each element are created. Therefore, after
transformation there are %NUMBER elements on the screen.
1, the elements are moved, otherwise
%NUMBER-1 copies of each element are created. Therefore, after
transformation there are %NUMBER elements on the screen.
1, the elements
are moved, otherwise %NUMBER-1 copies of each element are created.
Therefore, after transformation there are %NUMBER elements on
the screen.
This command is used to round off angles between SEGMENTS and ARCS.
ROUND *( <constraint> <constraint> )We round off an angle between the two constraint with radius %RADIUS, the rounded angle will always turn counterclockwise. A rounded angle is an arc whose supporting circle is tangent to the two constraint. The arc starts at the first point of tangency and ends at the second point of tangency, turning counterclockwise. If one of the constraint is an ARC or a SEGMENT, this constraint is modified in such a way that the element terminates at the point of tangency with the rounded angle.
 CONTOUR   (<LINE> | <CIRCLE>)  (<LINE> | <CIRCLE>)
              (<LINE> | <CIRCLE>) (COMPLE_ARC | ")
           *( (<LINE> | <CIRCLE>) (COMPLE_ARC | ")      )
This command is used to define a contour
formed by SEGMENTS and ARCS supported by a set of straight lines and
circles. The program functions by calculating the intersection of constraint
i with constraint i+1, which gives point I, then the intersection of
constraint i+1 with constraint i+2, which gives point I+1. I and I+1
form a new portion of the contour and so on.
Let us give an example with straight lines (figure 1.25):
Let us assume that we have five lines 


 that
intersect at
that
intersect at 


 , and that we wish to define the
contour composed of the segments
, and that we wish to define the
contour composed of the segments  ,
,  ,
,  ,
,
 and
and  . We denote by +i the ith selected point.
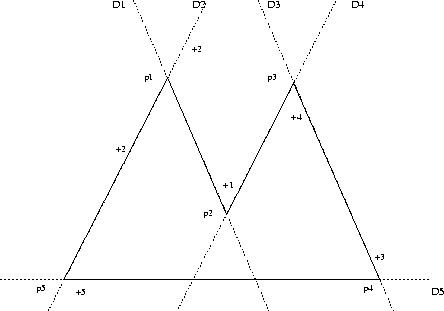
Figure 1.25: Example of contour definition
We select at +2 then at +1 which defines
Then we select at +4 which defines (at this point, the
program draws
Then we select at +3 which defines (at this point, the
program draws
Then we select at +5 which defines (at this point, the
program draws
Then we select at +2 which defines (at this point, the
program draws
Then we select at +1 which defines (at this point, the
program draws
In the case of circles, we must be careful because the selection points are used to remove ambiguities of multiple intersections: the selection point of the i constraint is used to remove the selection ambiguity between constraints i and i+1.
REVERSE *( <ARC> | <SEGMENT> )

 (Symmetry
/ P1)
(Symmetry
/ P1)
COMPLE_ARC *ARCChanges an ARC into its complement if
 then
then  otherwise

INVERT *(<ARC> | <SEGMENT> | <SPLINE>)
Inverts an ARC, SEGMENT or a SPLINE


  CUT  * (  <point_coor> *(<ARC> | <SEGMENT> | <SPLINE>)
             | (<LINE> | <CIRCLE> | <ARC> | <SEGMENT> | <SPLINE>)
               (<LINE> | <CIRCLE> | <ARC> | <SEGMENT> | <SPLINE>)
           )
If we first select point, we cut an
ARC, a SEGMENT or a SPLINE in two by the projection of point on the
element.
 CHANGE *(  ANGLE <ARC> (<VALUE> | IDEM)
           | RADIUS <CIRCLE> (<VALUE> | IDEM)
           | <POINT> <point_coor>)
This command is used to change :
 ADD *(  POINT   *( <ARC> | <SEGMENT> | <SPLINE> | <POINT> <POINT> )
           | SEGMENT *( <SEGMENT> <SEGMENT> )
           | SPLINE  *( <SPLINE> (   <SPLINE> | *<POINT>  ) )
           | ARC     *( <ARC> <ARC>  )
MERGE *( <segment> <segment> | <arc> <arc> | <spline> <spline> )
This command is used to merge 2 SEGMENTS, 2 ARCS or 2 SPLINES that have a common extremity into a single element of the same type. The resulting element has the same orientation as the first selected element. This instruction is only executed if the following conditions are met: