


![[BIG]](../icons/zoom18.gif)
![[Normal]](../icons/zoom14.gif)
![[small]](../icons/zoom10.gif)
Next: 3 Visualization of solutions
Up: 2 Visualization of meshes
Prev: 2.3 Three-dimensional meshes TRNOXX
Contents
REFEXX is used to visualize three-dimensional or two-dimensional meshes (in the latter case, it adds a third
null coordinate to each point). It also offers numerous mesh manipulation and checking possibilities.
It can also be used for assigning reference or sub-domain numbers to mesh items.
Differing from other graphics modules, REFEXX uses the principle of
roll-down menus to define the numerous choices available.
The presentation of the screen, shown in figure 2.14, consists of several windows:
- the graphics window, F1, where the plot is displayed,
- the main menu, in F2, the window containing the application's menu or sub-menu,
- the secondary menu, in F3, i.e. the menu complementary to the menu appearing in F2,
- a input-output zone F4,
- a location for a keyword in F5,
- a general legend in F6.
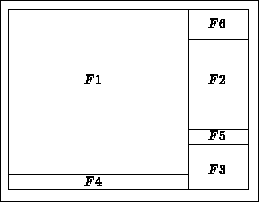
Figure 2.14: Organization of the windows of REFEXX
The commands can be defined in two ways:
- by clicking the line corresponding to the command chosen in the menu (window F2),
- by typing on the screen the equivalent keyword (which appears in F5).
In this manner, we move around in the tree until the desired action is selected.
The inverse operation (return in reverse), is performed in the following manner:
- click the corresponding line, i.e. the root of the tree, or
- click >> QUITTER in the secondary menu, or lastly
- type the keyword Q which is equivalent to the action >> QUITTER.
The menus consists of two types of action:
- actions which produce sub-menus containing more actions. These actions end with '...' indicating
the existence of a sub-menu.
- "normal" actions (affective action or assigning a status).
As briefly indicated above, the aim of REFEXX is to plot meshes and manipulate them. In more detail, we
can:
- define the plot choice by entering the observation conditions, taking the notions of visibility
(parts hidden or not) into account, plotting in solid line mode or with colored-in faces,
- select the items to plot (references and sub-domains),
- define and visualize cuts, by a plane, of the object displayed on the screen,
- check the quality of elements graphically, in particular by animating them,
- move points and assign linear transformations in a mesh and save the result,
- enrich a mesh (assign reference and sub-domain numbers),
- construct the data files by extracting all, or part, of the components from the object.
The element quality checking corresponds to tetrahedra only.
- Activate preprocessor REFEXX.
- Choose the output terminal.
- The main menu appears (see below) in window F2.
- Enter, in window F4, the name of the file containing the mesh (validate by clicking on the return key).
- The MODULEF main menu appears.
- An automatic plot is obtained by refreshing the screen. To do this, we go to the sub-menu
"MODIFIER LA VISU..." (by clicking on it in the main menu) and then click on "RAFRAICHIR".
More directly, the user can type "RAF", the equivalent keyword (after typing RAF and returning, we note
that window F2 is in the state it would have been if we proceeded as indicated initially).
The menus contain a certain number of choices, which are of two types:
- Type 1:
- the choice corresponding to the definition of an action (example
"SAUVER LA SD")
or a state (for example, choose a "COUPE OPAQUE"),
- Type 2:
- the choice is itself a menu containing two types of choices.
The main menu, "MODULEF", gives access to the following sub-menus:
      MODULEF
         MODIFIER LA VISU
            TOURNER AUTOUR
            COUPER
            REFERENCES TRACEES
            ITEMS TRACES
            NUMERO
         INFO SUR OBJET
            REFERENCE POINT
         VERIF DU MAILLAGE
         AFFECTER REFERENCE
         REFERENCE PAR LOT
         CHANGER REFERENCE
         CONSTRUCTION DE BD
         TRANSFORMATION
- Main menu: "MODULEF"
-
- Access:
- Basic menu, obtained at initialization. The user returns to it when quitting (keyword
"Q" or ">> QUITTER") the sub-menus.
This menu is used to select the following items (we indicate the names of the possible options,
the option type in italics, the equivalent keyword in UPPERCASE, and the corresponding
description):
- MODIFIER LA VISU...: sub-menu - MV - To modify the visualization
(observation conditions, selecting the parts to visualize, assigning numbers, defining cuts, etc.,
see this sub-menu).
- INFO SUR OBJE...: sub-menu - INFO - To obtain information about the displayed mesh
(array NOP2, numbers, references, coordinates, etc.).
- VERIF DU MAILLAGE...: sub-menu - VRF - To check the mesh by displaying the elements with
animation, pointing out the bad elements, plotting the quality isovalues, etc.
- AFFECTER REFERENCE...: sub-menu - AFRF - To assign sub-domain and reference numbers to
designated elements.
- REFERENCE PAR LOT...: sub-menu - RFLO - To enable the above assignment to a set of items.
- CHANGER REFERENCE...: sub-menu - CHRF - To modify the reference or sub-domain numbers of items
already referenced.
- SAUVER LA SD: action - SAUV - To save a D.S. NOPO containing the modifications performed
on the initial mesh input. The output file name will be requested: this name must be new, no
name annuls the action.
- ENREGISTRER LA SD: action - ENRG - To save the current state of the D.S.
("SAUVER" also saves a D.S.).
- REVENIR A LA VERSION: action - REVV - To return to the last state saved.
- CONSTRUCTION DE BD...: sub-menu - COBD - To construct a data base of the object, its boundary
or the items with a particular reference or sub-domain number.
- TRANSFORMATION...: sub-menu - TRSF - To perform geometric transformations
(translation, symmetry, ...), or to move the boundary points.
- HARDCOPY: action - HARD - To activate a hardcopy of the screen.
- SOFTCOPY: action - SOFT - To activate a softcopy of the plot. The plot is reinterpreted
as a function of the terminal selected, and contains comments if desired (defined below). A plot
does not contain the screen menu part.
The secondary menu of menu "MODULEF..." is as follows:
- PLACER COMMENTAIRE: action - COM - To place a comment line in window
F5. This line will appear on the hardcopies and softcopies.
- NOUVEL OBJET: action - NEW - To change the mesh.
- >> FINIR: action - *FIN - To exit from REFEXX.

Figure 2.15: Example REFEXX: automatic mode
- Sub-menu "MODIFIER LA VISU":
-
- Access:
- Via the main menu.
This sub-menu is used to select the following items:
- TOURNER AUTOUR...: sub-menu - TOUR - To define a rotation around the object.
- PLUS PRES: action - Z+ - To approach the object.
- PLUS LOIN: action - Z- - To move away from the object.
- ZOOM: action - Z - To zoom by assigning two points on the screen
(extrema of the zoom zone).
- COUPER...: sub-menu - COUP - To perform a cut by a plane.
- REFERENCES TRACEES...: sub-menu - RFTR - To select the items to plot by choosing a
reference or sub-domain number.
- >> RAFRAICHIR: action - RAF - To refresh the screen.
- ITEMS TRACES...: sub-menu - TRAC - To define the plot mode (solid line, shrink,
etc.) and the visibility notions (parts hidden).
- ARETES COPLANAIRES: action - COP - If this item is shown, the coplanar edges are plotted,
if not they are not displayed.
- REMPLISSAGE FACES: action - REMP - If this item is displayed, the faces are colored-in,
if not they are the same color as the background.
- NUMERO...: sub-menu - NUM - To request to plot the item numbers or the sub-domain or reference
numbers.
- CRITERE COPLANEARITE: action - CCOP - To modify the criteria for deciding if two adjacent faces
are coplanar (by default 0.0001).
- PREMIER PLAN: action - PRPL - To correct, in certain cases, the imperfections
at the computational level of the hidden faces.
- VUE STANDARD: action - STD - To return the observer to his/her original position.
- VUE PRECEDENTE: action - PRE - To display the previous view (there is a cyclic stack with 5
contexts).
- VUE SUIVANTE: action - SUI - To display the next view (in the stack above).
- RECALCULE TOUT: action - RCAL - To update the internal arrays (numerical refreshing).
- STEREOSCOPIE: action - STER - To display the plot in stereoscopy.
The secondary menu "MODIFIER LA VISU..." is the following:
- >> QUITTER: action - Q - Return to the main menu.
Figure 2.16: Example REFEXX: visible edges, coplanar edges eliminated
- Sub-menu "TOURNER AUTOUR":
-
- Access:
- Via the sub-menu, "MODIFIER LA VISU" of the main menu.
This sub-menu is used to select the following items:
- VERS LA DROITE: status - D - Move the observer to the right by an angle of
30 degrees around the Z axis (value modifiable, see secondary menu).
- VERS LA GAUCHE: status - G - Move observer to the left by an angle of
30 degrees around the Z axis (value modifiable, see secondary menu).
- VERS LE HAUT: status - H - Move the observer to the top by an elevation angle of
30 degrees (value modifiable, see secondary menu).
- VERS LE BAS: status - B - Move the observer to the bottom by an elevation angle of
30 degrees (value modifiable, see secondary menu).
The actions are accumulated (if compatible, those actions taken into account
are in evidence in the menu) and and executed by clicking on "EXECUTION" in the secondary menu.
- Note:
- Once the action is evident in the menu, it will be executed at each screen refreshing
(including in the case of a softcopy), thus, to delete it, it is necessary to re-click.
The secondary menu of the sub-menu "TOURNER AUTOUR..." is the following:
- >> EXECUTION: action - X - Plot, taking the defined actions into account.
- ANGLE DE ROT HORIZON: status - AH - To redefine the rotational angle around the Z axis
(in degrees).
- ANGLE DE ROT VERTICA: status - AV - To redefine the rotational angle in elevation
(in degrees).
- RAPPEL DES ANGLES: status - RAP - To display the angles in window F4.
- >> QUITTER: action - Q - To return to sub-menu "MODIFIER LA VISU". The activated items in this menu
remain active.
- Sub-menu "COUPER:
-
- Access:
- Via the sub-menu "MODIFIER LA VISU" of the main menu.
The user can define:
- an opaque cut: the part of the object situated behind the cut plane is displayed and
the intersection of the cut plane with the elements is plotted.
- a transparente cut: the part of the object situated behind the cut plane is displayed and
the intersection of the cut plane with the elements is not plotted.
- a section: only the intersection of the cut plane with the elements is plotted.
The cut plane is defined with the aid of three points (click on the screen or enter their coordinates) or
via its equation. The equation of the cut plane will appear in window
F4. Otherwise, the points can be entered by mixing the two capturing methods possible in this case.
This sub-menu is used to select the following items:
- COUPE OPAQUE: status - CPO - To define an opaque cut.
- COUPE TRANSPARENTE: status - CPT - To define a transparent cut.
- SECTION: status - SEC - To indicate that a section of the object is desired.
- PAS DE COUPE: status - NCP - Remove the cut option.
- POINT ECRAN: action - PE - To define a point on the screen by clicking on it.
- NOEUD LE PLUS PROCHE: action - NP - To designate the point
in the object closest to the point clicked on the screen.
- 3 COORDONNEES: action - 3C - To define a point by entering its three
coordinates.
- EQUATION LITTERALE: action - EQ - To define the cut plane via its equation. Enter the
coefficients A, B, C and D of the plane defined by AX+BY+CZ+D = 0.
The secondary menu of the sub-menu "COUPER..." is the following:
- ANNULE TOUT: action - ANNT - To delete the set of points introduced previously.
- ANNULE DERNIER POINT: action - ANN - To delete the last point defined.
- >> EXECUTION: action - X - To calculate the cut plane and display the plot.
- >> QUITTER: action - Q - To return to the sub-menu "MODIFIER LA VISU" with the present state.
Figure 2.17: Example REFEXX: opaque cut
- Sub-menu "REFERENCES TRACEES":
-
- Access:
- Via the sub-menu "MODIFIER LA VISU" of the main menu.
In this sub-menu, the user selects those items to plot for which he/she enters the reference number
(in the case of faces) and/or the sub-domain number (in the case of elements).
It enables us to select the following items:
- TOUTES REFERENCES: status - TRF - All faces are selected (default option).
- FACES REFERENCEES: status - FRF - Only the faces with non-zero references are selected.
- FACES SANS REFERENCE: status - FNRF - Only the faces with zero reference are selected.
- REFERENCES DONNEES: action - DRF - To define the reference numbers of the faces to be selected.
The user enters the total (maximum 10) of these numbers followed by the set of numbers.
- TOUS LES SD: status - TSD - All the elements are selected (default option).
- SD DONNES: action - DSD - To define the sub-domain numbers of the elements to select. The user
enters the total (maximum 5) of these numbers followed be the set of numbers.
The secondary menu of sub-menu "REFERENCES TRACEES..." is given below:
- >> EXECUTION: action - X - Plot the object with the items as specified above.
- >> QUITTER: action - Q - Return to sub-menu "MODIFIER LA VISU".
- Sub-menu "ITEMS TRACES":
-
- Access:
- Via sub-menu "MODIFIER LA VISU" of the main menu.
This sub-menu is used to define the plot type and to specify the visibility notions. It enables us to select
the following items:
- PEAU VISIBLE: status - VIS - Only the visible faces (default option) are selected.
- SHRINK COTE VISIBLE: status - SHR - The visible faces are shrunken around their barycentre.
- PEAU NON VISIBLE: status - NVIS - Only the non-visible faces are selected.
- SHRINK COTE INVISIBL: status - NSHR - The non-visible are shrunken.
- ARETES DE LA PEAU: status - ARE - The edges of the outer surface are selected and plotted
using solid line mode.
- TOUTES LES ARETES: status - TAR - All the edges are selected.
- NUAGE DE POINTS: status - NUAG - The outer surface is plotted in solid line mode and all the
mesh points shown.
- SHRINK TOUS COTES: status - SHRT - The surface faces are plotted in solid line mode.
- SHRINK DE TOUT: status - TSHR - All the faces (surface and internal) are shrunken and
plotted in solid line mode (plot not readable well).
- ARETES SUSPECTES: status - SUS - The suspect edges appear in bold. A boundary edge
is called suspect if it does not belong exactly to two boundary faces (this
can nevertheless be the case of correct edges belonging two "internal boundaries").
- ARETES COPLANAIRES: status - COP - If this item is active, the coplanar edges are plotted.
- REMPLISSAGE FACES: status - REMP - If this item is active, the faces are colored-in, if not
they are the same color as the background.
- PAS D'ORIENTATION: status - ORI - A correct and purely volumetric object
has oriented faces. An object composed of triangles or quadrilaterals is not oriented. This option
is used to avoid the bold lines indicating suspect zones in the plot.
The secondary menu of sub-menu "ITEMS TRACES..." is given below:
- >> EXECUTION: action - X - Plot the object retaining the above selections.
- >> QUITTER: action - Q - Return to sub-menu "MODIFIER LA VISU".
Figure 2.18: Example REFEXX: solid line and elimination
- Sub-menu "NUMERO":
-
- Access:
- Via the sub-menu "MODIFIER LA VISU" of the main menu.
This sub-menu is used to display the number on the plot. The numbers may be item numbers (elements, points),
or reference or sub-domain numbers.
It enables us to select the following items:
- ELEMENTS: status - NGEL - To plot the element numbers (option active or not depending on the
plot option).
- NOEUDS: status - NGNO - To plot the mesh point numbers (option active or not depending on the
plot option).
- SOUS-DOMAINES: status - NRSD - To plot the element sub-domain numbers (option active or not depending on the
plot option).
- TOUT: status - NRTT - To plot the point, edge and face reference numbers (option active or not depending on the
plot option).
- NOEUDS: status - NRNO - To plot the point reference numbers (option active or not depending on the
plot option).
- ARETES: status - NRAR - To plot the edge reference numbers (option active or not depending on the
plot option).
- FACES: status - NRFA - To plot the face reference numbers (option active or not depending on the
plot option).
- TOUTES REFERENCES: status - NRAL - To plot all the reference numbers (option active or not depending on the
plot option).
- REFERENCE DONNEE: status - NRDO - To plot the reference numbers with a given value (option active or not depending on the
plot option). The user enters the number to be considered.
The secondary menu of sub-menu "ITEMS TRACES..." is given below:
- RAPPEL DU NUMERO: action - RN - Print the number selected in F4.
- CHANGER DE NUMERO: action - N - To change the number to be taken into account.
- >> EXECUTION: action - X - Plot the object retaining the above selections.
- >> QUITTER: action - Q - Return to sub-menu "MODIFIER LA VISU".
Figure 2.19: Example REFEXX: node numbers
- Sub-menu "INFO SUR OBJE":
-
- Access:
- Via the main menu.
This sub-menu is used to obtain information pertaining to the mesh under consideration. It enables the user to
select the following items:
- REFERENCE POINT...: sub-menu - INFP - Go to sub-menu to enquire about a point
(which will be designated).
- REFERENCE ARETE: action - INFA - Click on a (boundary) edge to obtain its number
in D.S. GEOM and its reference number (in F4).
- REFERENCE FACETTE: action - INFF - Click on a (boundary) face to obtain its
number in D.S. GEOM and its reference number (in F4). In the case of a cut,
we click on a point in the cut plane to obtain its coordinates and the sub-domain number
of the element to which it belongs.
- INFO GENERALE: action - INFG - Print array NOP2 of the mesh data structure.
The secondary menu of menu "INFO SUR OBJE" is given below:
- >> QUITTER: action - Q - Return to the main menu.
- Sub-menu "VERIF DU MAILLAGE":
-
- Access:
- Via the main menu.
The module is used for certain mesh verifications. It can check that all elements have positive volumes.
It can also examine any element by animating it. To do this, we define a magnifying glass and designate an
element in the cut plane
(it is thus necessary to define an opaque cut, or a
section beforehand). The element chosen is then visualized in the magnifying glass in
animated mode.
It can also be used to plot the quality isovalues for elements in the cut plane. The color blue indicates
good quality elements, whereas red is used for bad quality elements
(option valid only on color screens).
The quality of a tetrahedron is defined by:
where  is a normalization factor, h is the element diameter and
 is the radius of the inscribed sphere. An element with quality close to 1 is very good, whereas
the more Q increases the more the element is degenerate.
is the radius of the inscribed sphere. An element with quality close to 1 is very good, whereas
the more Q increases the more the element is degenerate.
The quality measurement is only valid for meshes composed of tetrahedra. For the others elements, it is necessary
to complete function CRIQUA.
The sub-menu is used to select the following items:
- ISO DE QUALITE: status - ISOQ - To plot the quality isovalues on a cut plane or a section.
- DEFINIR LA LOUPE: action - DEFL - To define a magnifying glass, i.e. a small window in
the screen, by clicking on two points, in which the selected element is then be displayed.
Several magnifying glasses can be defined.
- ELEMENT POINTE: action - LOUP - To define the element to plot in the last magnifying glass
defined beforehand. The element in the cut plane is selected by clicking on top of it.
All types of elements are possible. The quality (if it corresponds to a tetrahedron) and the volume of
the element are then displayed in the magnifying glass. The element pointer and its point coordinates
are shown in F4 whereas the element, displayed in solid line mode, appears on the object.
- ELEMENT NUMERO: action - ELNO - The same as above by selecting the element
by its number.
- POINT NUMERO: action - PONO - The same by selecting a point.
- VOLUMES NEGATIFS: action - VONE - To search for all elements with negative volumes
(it corresponds to those who are behind the cut plane if there is one, or all if not). The list of elements
found will appear. The negatives will be pointed out (dotted).
- ELEMENTS MAUVAIS: action - CRSU - To search , as above, for the elements for which
the quality exceeds a given value (which will be requested) (option valid for tetrahedra).
- ANIMATION LENTE: action - ANL - The element displayed in the magnifying glass is animated by
slow rotations.
- ANIMATION MOYENNE: action - ANM - The element displayed in the magnifying glass is animated by
medium speed rotations.
- ANIMATION RAPIDE: action - ANR - The element displayed in the magnifying glass is animated by
fast rotations.
The secondary menu of menu "VERIF DU MAILLAGE" is given below:
- >> QUITTER: action - Q - Return to sub-menu "MODIFIER LA VISU".
Figure 2.20: Example REFEXX: magnification and animation
- Sub-domain "REFERENCE POINT":
-
- Access:
- Via the sub-menu "INFO SUR OBJE" of the main menu.
This sub-menu is used to obtain information pertaining to a mesh point clicked on the
screen. The following items can be selected.
- NOEUD LE PLUS PROCHE: action - NPP - Return the coordinates, the number and the
reference number of the point which is closest to the point clicked on the screen (not
possible in the case of a cut).
- COORDONNEES POINTAGE: action - PNT - Return the coordinates of a point
(boundary or belonging to a cut plane) which is closest to the point clicked on the screen. The sub-domain
number is also given for the element cut (case of a cut).
The secondary menu of sub-menu "REFERENCE POINT..." is given below:
- >> QUITTER: action - Q - Return to sub-menu "INFO SUR OBJET".
- Sub-menu "AFFECTER REFERENCE":
-
- Access:
- Via the main menu.
This sub-menu is used to assign reference or sub-domain numbers to clicked items
individually (point, edge, face or element). The following items can be selected:
- REFERENCE POINT: action - RFPO - To reference the designated point, which appears in bold,
to the number indicated in the secondary menu.
- REFERENCE ARETE : action - RFAR - To reference the designated edge, which appears in bold,
to the number indicated in the secondary menu.
- REFERENCE FACETTE: action - RFFA - To reference the designated face, which appears in bold,
to the number indicated in the secondary menu.
- POINT/ARETE/FACE: action - RFT - To reference the designated points, edges and face,
which changes color,
to the number indicated in the secondary menu.
- REFERENCE S/DOMAINE: action - RFSD - To change the sub-domain number.
- RAFRAICHIR: action - RAF - To refresh the image.
- INFO SUR OBJET...: sub-menu - INFO - To go to the sub-menu.
The secondary menu of menu "AFFECTER REFERENCE..." is given below:
- COMMANDE GROUPEE: action - GRP - To group together the searches. The clicked points
are grouped together in one stack in order to perform the search at a later stage (maximum
200 items can be stacked).
- CHANGER DE NUMERO: action - N - To change the number.
- RAPPEL DU NUMERO: action - RAPL - The number under consideration is written in F4.
- ANNULE DERNIERE COMM: action - ANN - Delete the last command.
- DETRUIT COMMANDE: action - DETC - To delete all the grouped commands.
- >> QUITTER: action - Q - Return to the main menu.
- >> EXECUTION: action - X - Initiate execution while retaining the above selections.
- Sub-menu "REFERENCE PAR LOT":
-
- Access:
- Via the main menu.
This sub-menu is used to assign reference or sub-domain numbers to a group of items
(point, edge, face or element). The following items can be selected:
- ENSEMBLE VISUALISE: status - EVI - Select the set of faces visualized. The selection
menu of the item to be referenced is then called.
- DEVANT LE PLAN: status - DPL - Select the faces not visualized
(complementary to the previous). The selection
menu of the item to be referenced is then called.
- TOUT L'OBJET: status - TOB - Select the entire object.
The selection menu of the item to be referenced is then called.
- ENSEMBLE REFERENCE: status - ERF - Select the set of faces with non-zero
references. The selection menu of the item to be referenced is then called.
- ENSEMBLE SANS REF: status - ENRF - Select the set of faces with zero
reference. The selection menu of the item to be referenced is then called.
- ENS DE REF DONNEE: status - EDRF - Select the set of faces with given reference
(the user can choose up to 10 numbers). The selection menu of the item to be referenced is then called.
- SOUS-DOMAINS: action - SDRF - To assign a sub-domain number to all the elements in the mesh.
The secondary menu of menu "REFERENCE PAR LOT..." is given below:
- >> QUITTER: action - Q - Return to the main menu.
- Sub-menu "CHANGER REFERENCE":
-
- Access:
- Via the main menu.
This sub-menu is used to change reference or sub-domain numbers of a group of items
(point, edge, face or element) by specifying the
correspondence between the number to change and the new number to assign to these items.
The following items can be selected:
- DES SOUS-DOMAINES: status - CHSD - To select the elements with a given sub-domain
number in order to change this number (see secondary menu).
- DES FACES: status - CHFA - To select the faces with a given reference
number in order to change this number (see secondary menu).
- DES ARETES: status - CHAR - To select the edges with a given reference
number in order to change this number (see secondary menu).
- DES POINTS: status - CHPO - To select the points with a given reference
number in order to change this number (see secondary menu).
- DE TOUT: status - CHTO - To select the faces, edges and points with a given reference
number in order to change this number (see secondary menu).
The secondary menu of menu "CHANGER DE REFERENCE..." is given below:
- REF1
 REF2: action - RFRF - To indicate the transfer to perform. The number to be changed and
the new value to assign to the items are requested.
REF2: action - RFRF - To indicate the transfer to perform. The number to be changed and
the new value to assign to the items are requested.
- ETAT ACTUEL: action - RAP - Display the above correspondence in F4.
- >> EXECUTION: action - X - Execute the defined request.
- >> QUITTER: action - Q - Return to the main menu.
- Sub-menu "CONSTRUCTION DE BD":
-
- Access:
- Via the main menu.
This sub-menu is used to construct a Data Base containing a mesh, or a part of a mesh. Two Ascii files
are created:
- A file containing the point coordinates and references, which have the following form:
      NP
      Loop from 1 to NP
         X   Y  Z  REFP
      End of loop
where NP is the number of points, X, Y and Z are the coordinates and NREF is the reference of these points.
- A file containing the mesh connectivity, which has the following form;
      NE
      Loop from 1 to NE
         NNO   NONO(1:NNO)   NDSD  NREFF(1:NBFA)   NREFA(1:NBAR)
      End of loop
where NE is the number of elements, NNO is the number of points per element (4 for a tetrahedron, -4 for a
quadrilateral), NONO is the array of the |NNO| element point numbers, NDSD is the element
sub-domain number (the reference in the case of a face), NREFF and NREFA are the arrays containing the
face and edge reference numbers of the element
(NREFF only exists for the case of a volume).
A prefix is requested to name the files (prefix.coor, prefix.vol , prefix.points or
prefix.faces according to the case).
The element definitions are considered as in a D.S. NOPO.
The above sub-menu is used to select the following items:
- BD DE L'OBJET: action - BDOB - To create the DB of the object. The file
prefix.vol will contain the element connectivity and the file prefix.coor the point coordinates.
- BD DE LA PEAU: action - BDPO - To create the DB for the object boundary. The elements to be saved
are triangles and quadrilaterals.
The file prefix.faces will contain the element connectivity and the file prefix.coor the point coordinates.
- BD PEAU TRIANGULEE: action - BDPT - To create the DB for the object boundary split into
triangles. The elements to be saved are triangles.
The file prefix.faces will contain the element connectivity and the file prefix.coor the point coordinates.
- TOUTE LA PEAU: action - PEAU - To create the DB for the outer surface of the object.
The elements to be saved are triangles and quadrilaterals.
The file prefix.faces will contain the element connectivity and the file prefix.coor the point coordinates.
- REFERENCE DONNEE: action - PEAU - To create the DB for items on the outer surface of the object
with given reference numbers (the user inputs these numbers (10 maximum).
The elements to be saved are triangles and quadrilaterals.
The file prefix.faces will contain the element connectivity and the file prefix.coor the point coordinates.
- TOUS LES SD: action - BSD - To create the DB of the object. The file
prefix.vol will contain the element connectivity and the file prefix.coor the point coordinates.
- SD DONNEE: action - BRSD - To create the DB of the object's elements with given sub-domain
number (the user inputs these numbers (5 maximum)).
The file prefix.vol will contain the element connectivity and the file prefix.coor the point coordinates.
- INVERSION DE SENS: status - INV - The data is saved in the inverse order
of that defined in D.S. NOPO.
The secondary menu of menu "CONSTRUCTION DE BD..." is given below:
- >> QUITTER: action - Q - Return to the main menu.
- Sub-menu "TRANSFORMATION":
-
- Access:
- Via the main menu.
This sub-menu is used to perform geometric transformations on a mesh: linear transformations or
input via a matrix. Several transformations can be stacked. Furthermore, it is possible
to move the boundary points. The transformed mesh can be saved. The following items can be selected;
- TRANSLATION: status - TRAN - To define a translation whose 3 components must be input.
- SYMETRIE: status - SYM - To define a symmetry with respect to a plane whose equation must be input.
- ROTATION: status - ROT - To define a rotation around an axis. The rotational axis
is defined by a vector and a point; these 6 values must be input in addition to the angle in degrees.
- DILATATION: status - DIL - To define a anisotropic dilation whose 3 coefficients must be input
in addition to the coordinates of an invariant point.
- AUTRE: status - AUTR - To define a transformation via its
 matrix and its
right-hand-side (vector with 3 components). The new point is defined via
matrix and its
right-hand-side (vector with 3 components). The new point is defined via  .
.
- INVERSION DE SENS: action - INVS - To invert the direction.
- BOUGER POINT: action - BPO - To move the clicked point of a vector defined via the
secondary menu (no verification).
- BOUGER LES X: action - BPX - To move points of given references by assigning a
given value to their x coordinates (no verification).
- BOUGER LES Y: action - BPY - To move points of given references by assigning a given value to their
y coordinates (no verification).
- BOUGER LES Z: action - BPZ - To move points of given references by assigning a given value to their
z coordinates (no verification).
- RAFRAICHIR: action - RAF - To refresh the screen.
- PREMIER PLAN: action - PRPL - Bring the designated face to the foreground.
The secondary menu of menu "TRANSFORMATION..." is given below:
- ANNULER TOUT: action - ANNT - Delete all the transformations defined.
- ANNULER DER TRANSFO: action - ANN - Delete the last transformation defined.
- DEFINIR UN VECTEUR: action - V - Define the vector used to move points.
- VOIR LE VECTEUR: action - VVEC - Display the vector in F4.
- >> EXECUTION: action - X - Execute the requests defined.
- >> QUITTER: action - Q - Return to the main menu.
An example of geometric transformations is given in figures 2.21 and
2.22. The initial object, shown in the first figure, is dilated in the z-direction with a
factor 1.5. The result is shown in the second figure (the two figures are softcopies).
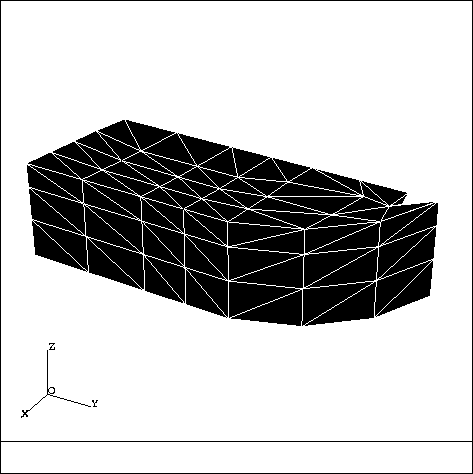
Figure 2.21: Example REFEXX: initial mesh in automatic mode
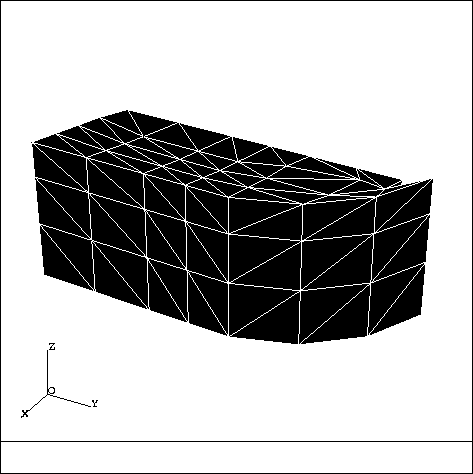
Figure 2.22: Example REFEXX: mesh after dilation
General keywords:
- X Execution
- Q Quit
- RAF Refresh
- HARD Hardcopy
- SOFT Softcopy
- *FIN End
For menu "MODULEF":
- MV Modify the visualization
- INFO Information pertaining to the object
- VRF Mesh verification
- AFRF Assign references
- RFLO References by group
- CHRF Change a reference
- SAUV Save the Data Structure
- ENRG Write the Data Structure
- REVV Return to the version
- COBD Construct a Data Base
- TRSF Transformations
- COM Insert comments
- NEW Change mesh
For sub-menu "MODIFIER LA VISU":
- TOUR Turn around
- Z+ Closer
- Z- Further
- Z Zoom
- COUP Cut
- RFTR Plot references
- TRAC Plot items
- COP Coplanar edges
- REMP Color-in faces
- NUM Number
- CCOP Coplanarity criteria
- PRPL Foreground
- STD Standard view
- PRE Preceding view
- SUI Next view
- RCAL Recalculate all
- STER Stereoscopy
For sub-menu "TOURNER AUTOUR":
- D Towards the right
- G Towards the left
- H Towards the top
- B Towards the bottom
- AH Horizontal rotational angle
- AV Vertical rotational angle
- RAP Display the angles
For sub-menu "COUPER":
- CPO Opaque cut
- CPT Transparent cut
- SEC Section
- NCP No cut
- PE Screen point
- NP Closest node
- 3C 3 coordinates
- EQ Literal equation
- ANNT Delete all
- ANN Delete the last point
For sub-menu "REFERENCES TRACEES":
- TRF All references
- FRF Referenced faces
- FNRF Non-references faces
- DRF Given references
- TSD All sub-domains
- DSD Given sub-domains
For sub-menu "ITEMS TRACES":
- VIS Visible outer-surface
- SHR Shrink visible edges
- NVIS Non-visible outer-surface
- NSHR Shrink non-visible edges
- ARE Surface edges
- TAR All edges
- NUAG Points
- SHRT Shrink all edges
- TSHR Shrink all
- SUS Suspect edges
- COP Coplanar edges
- REMP Color-in faces
- ORI No orientation
For sub-menu "NUMERO":
- NGEL Element numbers
- NGNO Node numbers
- NRSD Sub-domain numbers
- NRTT All numbers
- NRNO Node reference numbers
- NRAR Edge reference numbers
- NRFA Face reference numbers
- NRAL All reference numbers
- NRDO Given reference number
- RN Display number
- N Change number
For sub-menu "INFO SUR OBJE":
- INFP Node reference
- INFA Edge reference
- INFF Face reference
- INFG General information
For sub-menu "REFERENCE POINT":
- NPP Closest point
- PNT Point coordinates
For sub-menu "VERIF DU MAILLAGE":
- ISOQ Quality isovalues
- DEFL Define a magnifying glass
- LOUP Point to an element
- ELNO Designate an element via its number
- PONO Designate a point via its number
- VONE Elements with negative volume
- CRSU Elements of quality worse than...
- ANL Slow animation
- ANM Medium animation
- ANR Fast animation
For sub-menu "AFFECTER REFERENCE":
- RFPO Node reference
- RFAR Edge reference
- RFFA Face reference
- RFT Face, node and edge reference
- RFSD Sub-domain
- INFO Information
- RN Display number
- N Change number
For sub-menu "REFERENCE PAR LOT":
- TOB Entire mesh
- EVI All visualized items
- DPL In front of the plane
- ERF All referenced items
- ENRF All non-referenced items
- EDRF All items with given reference
- SDRF All items with given sub-domain
For sub-menu "CHANGER REFERENCE":
- CHSD Change a sub-domain number
- CHFA Change a face reference
- CHAR Change an edge reference
- CHPO Change a node reference
- CHTO Change a group reference
- RFRF Old/new number correspondence
- RAP Display numbers
For sub-menu "CONSTRUCTION DE BD":
- BDOB DB of object
- BDPO DB of outer-surface
- BDPT DB of triangulated surface
- PEAU DB of entire surface
- BRFP DB of items with a given reference
- BSD DB of items of all sub-domains
- BRSD DB of items with a given sub-domain
- INV Invert direction
For sub-menu "TRANSFORMATION":
- TRAN Translation
- SYM Symmetry w.r.t. a plane
- ROT Rotation
- DIL Anisotropic dilation
- INVS Invert direction
- BPO Move a point
- BPX Move points by assigning the x value
- BPY Move points by assigning the y value
- BPZ Move points by assigning the z value
- PRPL Foreground
- ANNT Delete all transformations
- ANN Delete last transformation
- V Define a vector
- VVEC Display this vector
The plots presented (figure 2.15 to 2.20) were obtained by hardcopies:
- Figure 2.15
- : Execute REFEXX, type -1 (selection of terminal), enter the file name,
type
keyword RAF to view plot, type keyword HARD.
- Figure 2.16
- : Execute REFEXX, type -1 and enter the file name, go to menu
"MODIFIER LA VISU" and deactivate the items
"REMPLISSAGE FACE" and "ARETES COPLANAIRES", type RAF and then keyword HARD.
- Figure 2.17
- : Execute REFEXX, type -1 and enter the file name, go to menu
"MODIFIER LA VISU" and deactivate "REMPLISSAGE FACE" and "ARETES COPLANAIRES",
type RAF and then keyword HARD.
- Figure 2.18
- : Execute REFEXX, type -1 and enter the file name, go to menu
"MODIFIER LA VISU" and choose "COUPER", in the sub-menu click on items "COUPE OPAQUE" and
then "POINT ECRAN", designate three points on the object and click on item "EXECUTION",
lastly, type the keyword HARD.
- Figure 2.19
- : Execute REFEXX, type -1 and enter the file name, go to menu
"MODIFIER LA VISU" and deactivate "REMPLISSAGE FACE" and "ARETES COPLANAIRES" and click on
"NUMERO", in this sub-menu click on "NOEUDS" and then click "EXECUTION", and lastly type HARD.
- Figure 2.20
- : Execute REFEXX, type -1 and enter the file name, go to menu
"MODIFIER LA VISU" and choose "COUPER", in the sub-menu click on items "COUPE OPAQUE" and
then "POINT ECRAN", designate three points on the object and click on item "EXECUTION". Return to menu
"MODULEF" and choose "VERIF DU MAILLAGE". Define the display zone of the element(s) to examine by
choosing "DEFINIR LA LOUPE", after which, by clicking on two points on the screen, a window appears. Click
on an element in the cut pane, which is then displayed in the window. By clicking on "ANIMATION LENTE", for
example, the current tetrahedron is animated, which can be viewed before going to another element.
Lastly, type keyword "HARD".
The plots in figures 2.21 and 2.22 result from softcopies.
Next: 3 Visualization of solutions
Up: 2 Visualization of meshes
Prev: 2.3 Three-dimensional meshes TRNOXX
Contents
